


A galette(!) recipe to brighten any day
From a book dedicated to them, this apricot pie-not-pie with pumpkin and sesame seeds is worth turning on the oven for.

98 DAYS TO GO — AND COUNTING!

Bonjour! Bonjour!
Joy can pop into your life in so many different ways, in every imaginable size and at all hours. But if it doesn’t hit you, then you have to look for it. Make it. Or even bake it. It was in the spirit of making and baking joy, that on a day when the skies were at their most Parisian gray, when the rain was persistent and the air carried a chill, I opened Rebecca Firkser’s sunny debut cookbook, GALETTE! [Bookshop / B&N / Amazon] and turned the day around by making her summery Apricot and Pepita-Sesame Frangipane Galette.
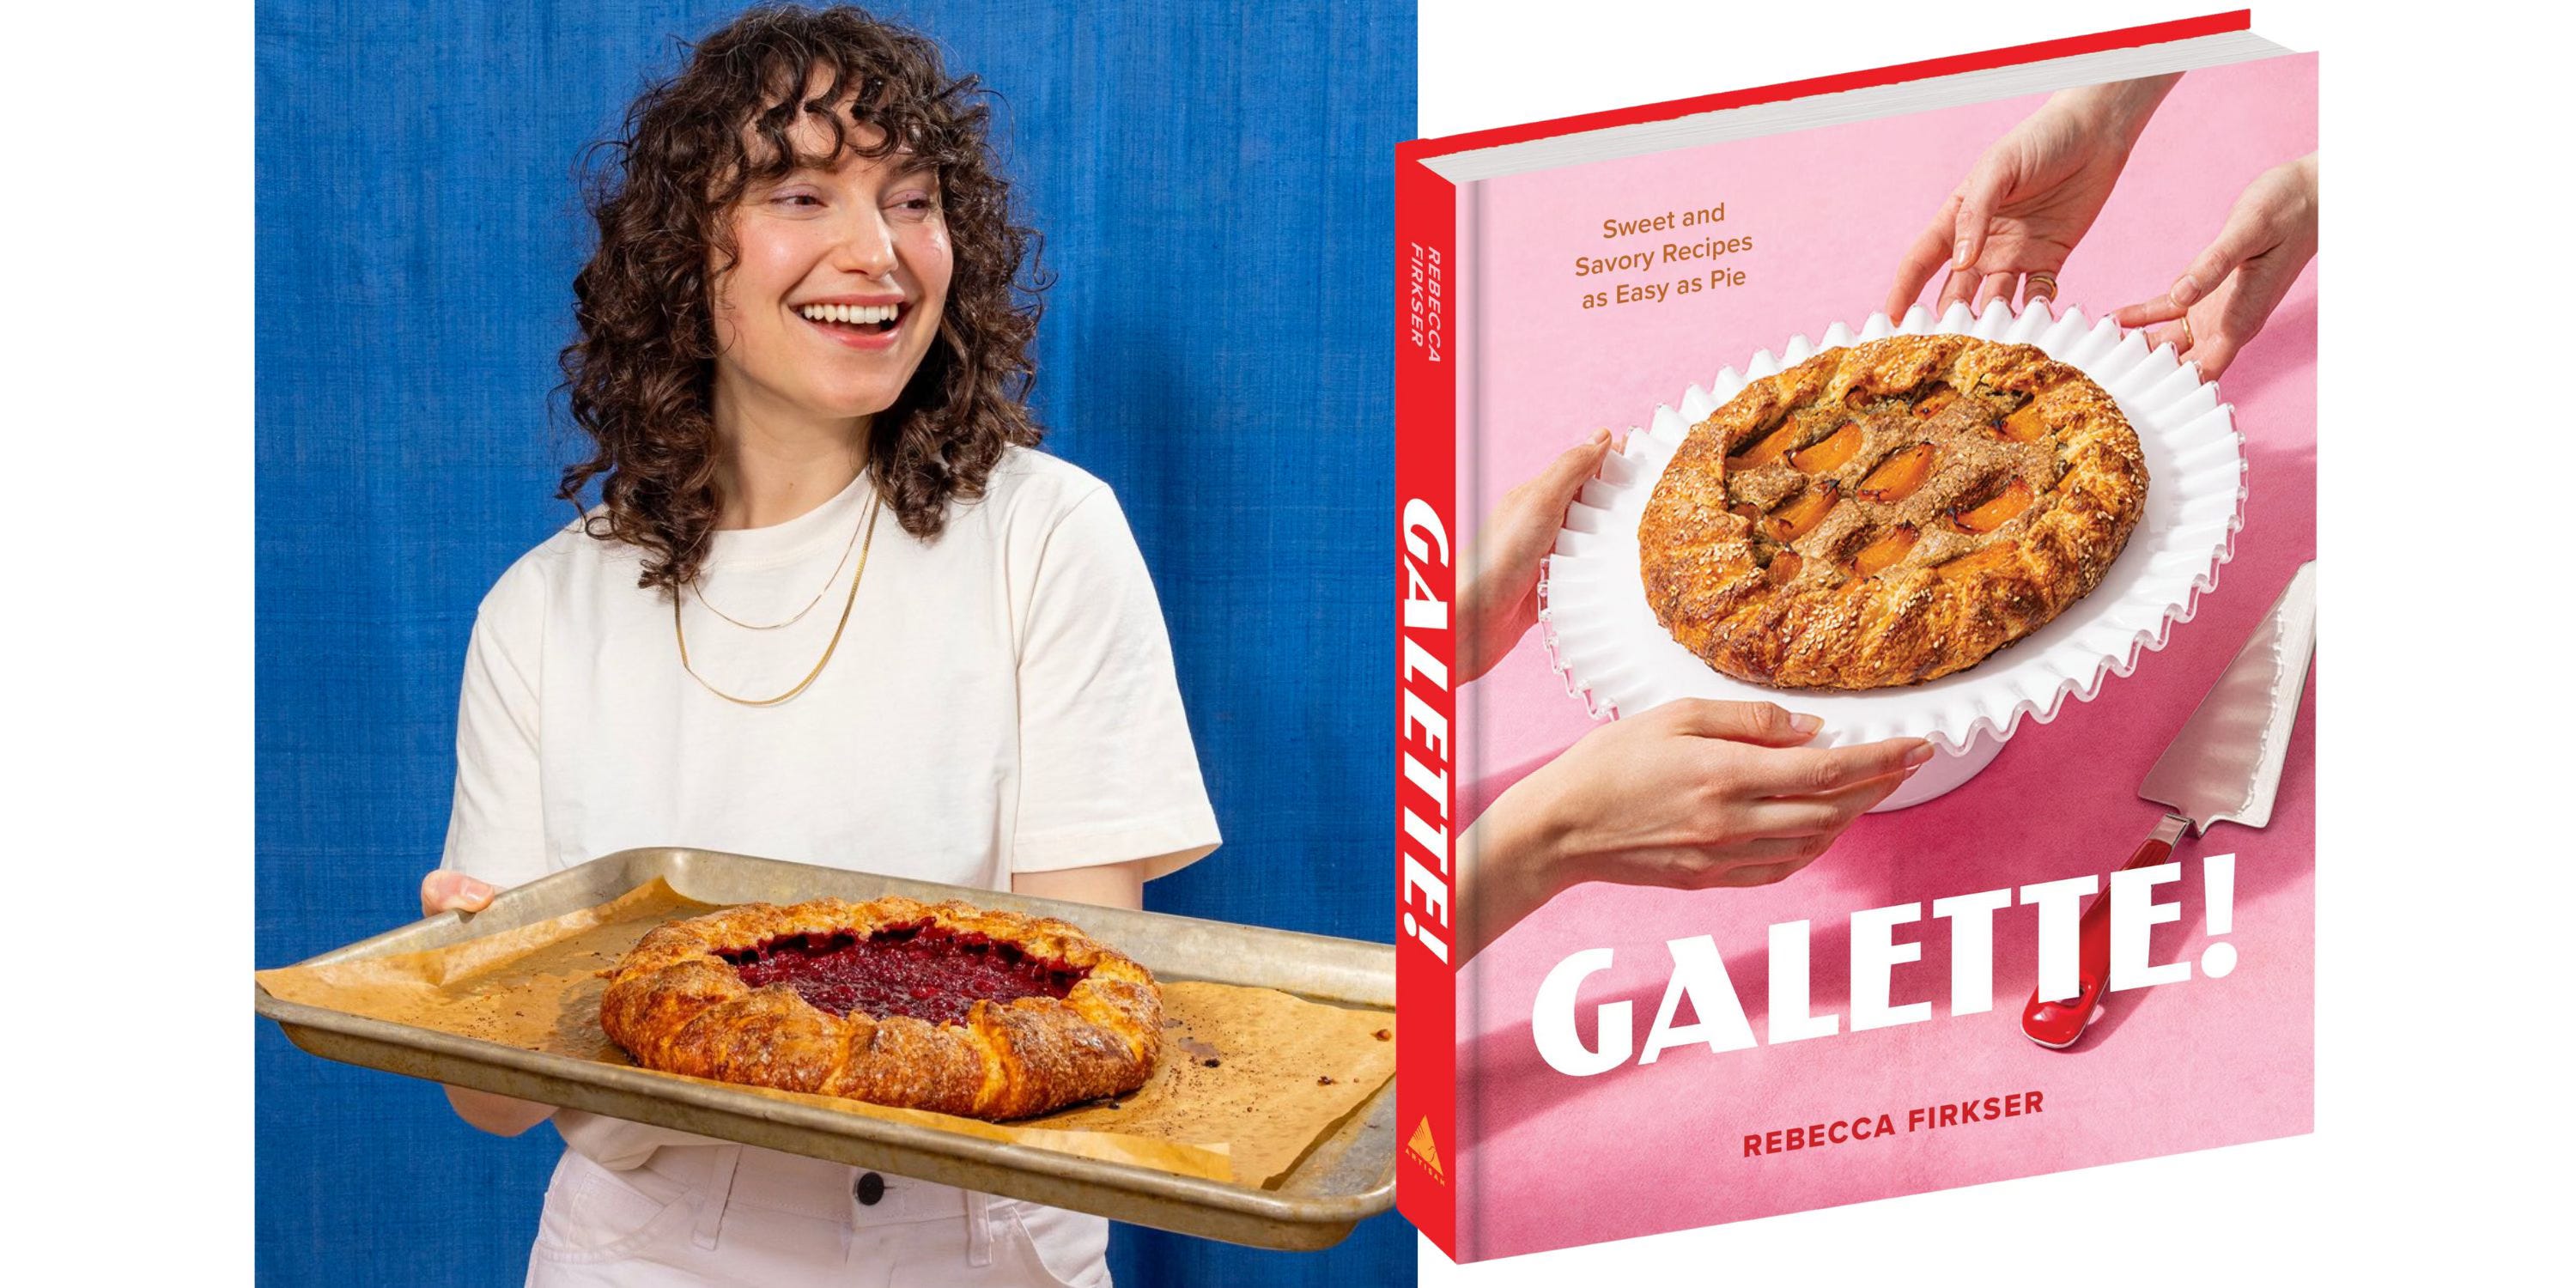
If you don’t already have Rebecca’s book, then I’m betting that you either read about it — maybe you saw it in Jenna Helwig’s Cookbookery Collective (I love this newsletter) — or maybe you heard her on Jessie Sheehan and Cherry Bombe’s beloved podcast, She’s My Cherry Pie. The book’s gotten a lot of attention, just as it should have — it’s a good one. And yes, galettes might be my favorite kind of pie — who doesn’t love something that’s so easy that even kids can make it!


Galette / rustic tart / crostata
A galette also does business as a rustic tart or a crostata or a freeform tart or sometimes even an open-faced pie. (While pie pans are rarely part of galette-making, Rebecca’s got a few really fun pan-galettes.) And its easy-going nature is one of its great charms — not only doesn’t neatness count, neatness shouldn’t ever be used in the same sentence as galette. A galette is meant to be exuberant, meant to show your fingerprints. At its most basic, it’s a round of dough folded up and around a filling, sweet or savory, fruity a lot of time, creamy sometimes. And because it’s impossible to lift dough up and place it precisely against fruit, a galette’s hallmark is its ruffles and pleats. Its unpredictability and inevitable bumps and ridges are its enticements.
Of course, since there isn’t much to a galette, everything depends on the goodness of the elements, starting with the crust.
The crust
A galette crust is a juggler. It has to taste good, of course, and it has to have an appealing texture, but it’s got a few other big jobs to ace: It’s got to hold its shape, usually without the support of a pan; keep the filling within bounds; and stay crisp and cutable no matter what it’s encasing. (Soggy bottoms are disastrous in a galette.) Happily, Rebecca’s crust, which is good for both sweet and savory galettes, is up to the job — it’s delicious, sturdy and still flaky. She recommends making it by hand (although there are directions in the book for preparing it in a food processor) and gives it a couple of turns, the way you would a laminated dough — a boost to its flakiness. And she adds a little vinegar to the dough for tenderness. She rightly names it, “A Good Crust.”
xoxoDorie is a reader-supported newsletter. Upgrade or invite more friends to the galette get-together and enjoy sneak peeks of DORIE’S ANYTIME CAKES.

The filling
Rebecca’s got a bunch of fillings for galettes — some for stone fruit, some for berries, some for fall harvest fruits, some for greens and some for vegetables. Some are creamy like quiches, some are juicy like pies. Some have just a slick of something delicious coating the crust before the main ingredient goes in and some have a plump cushion to hold the fruit. They’re all different but they’re all members in good standing of the galette clan.


The apricot pepita-sesame frangipane galette
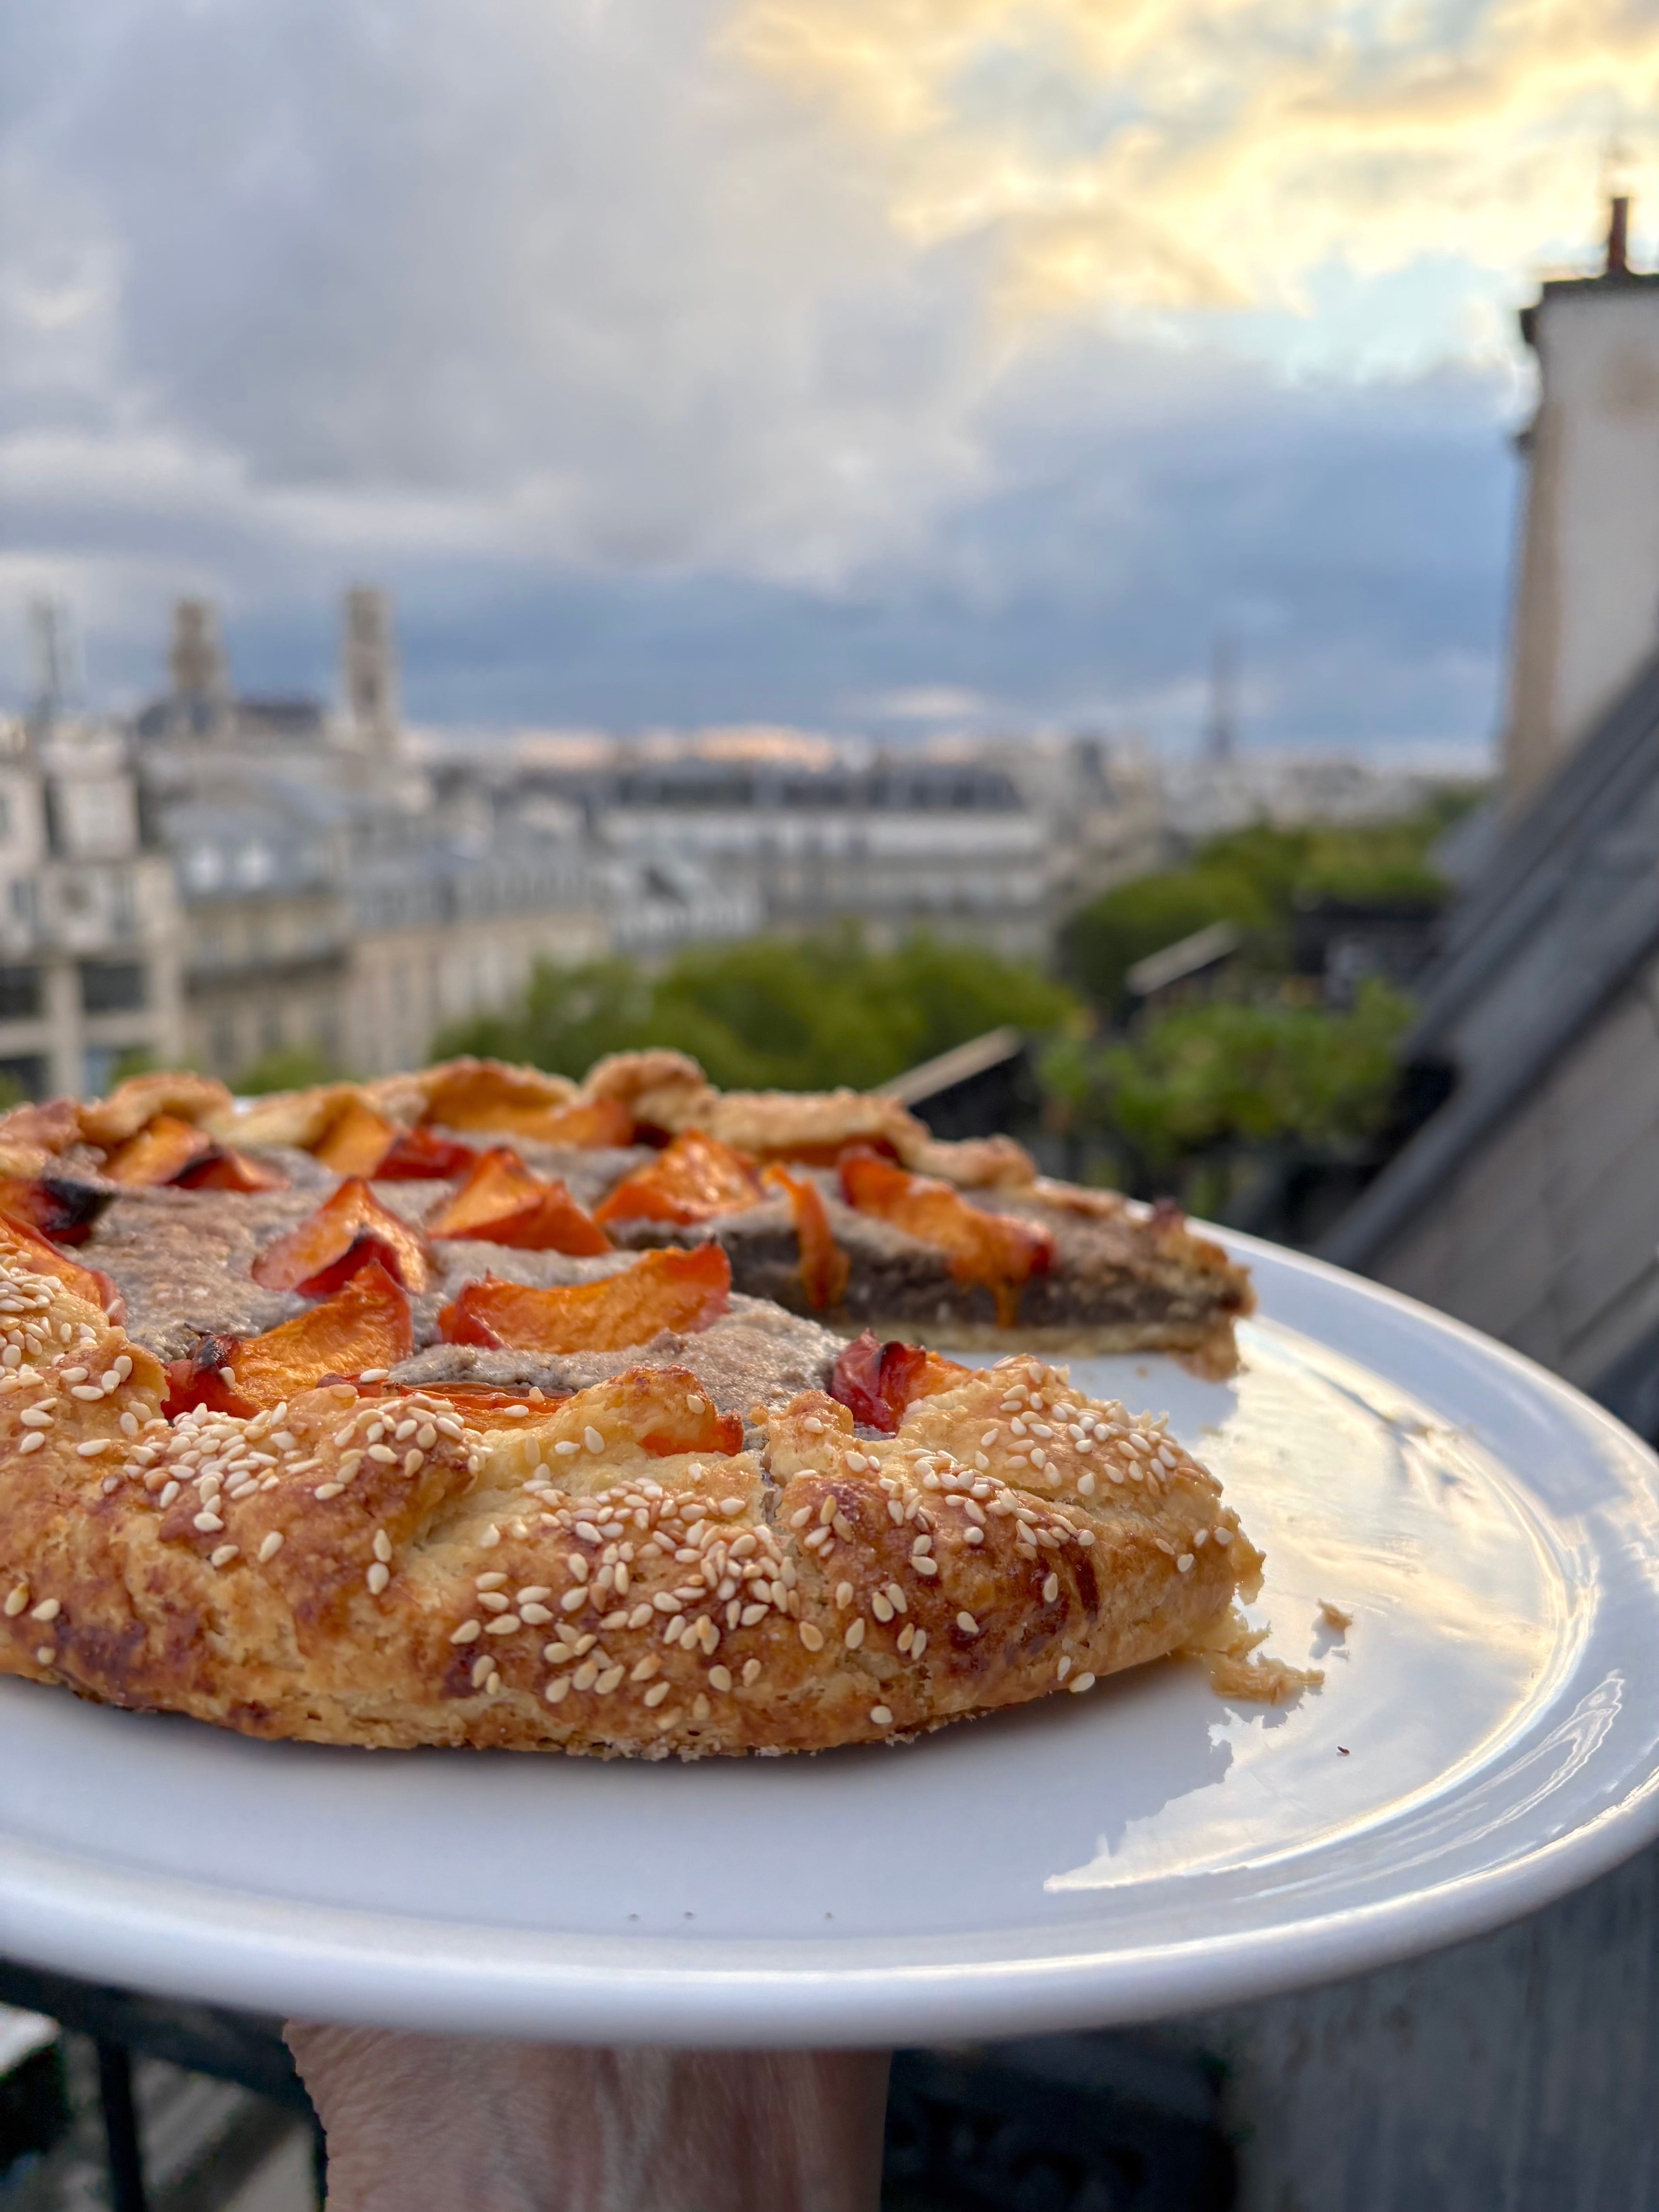
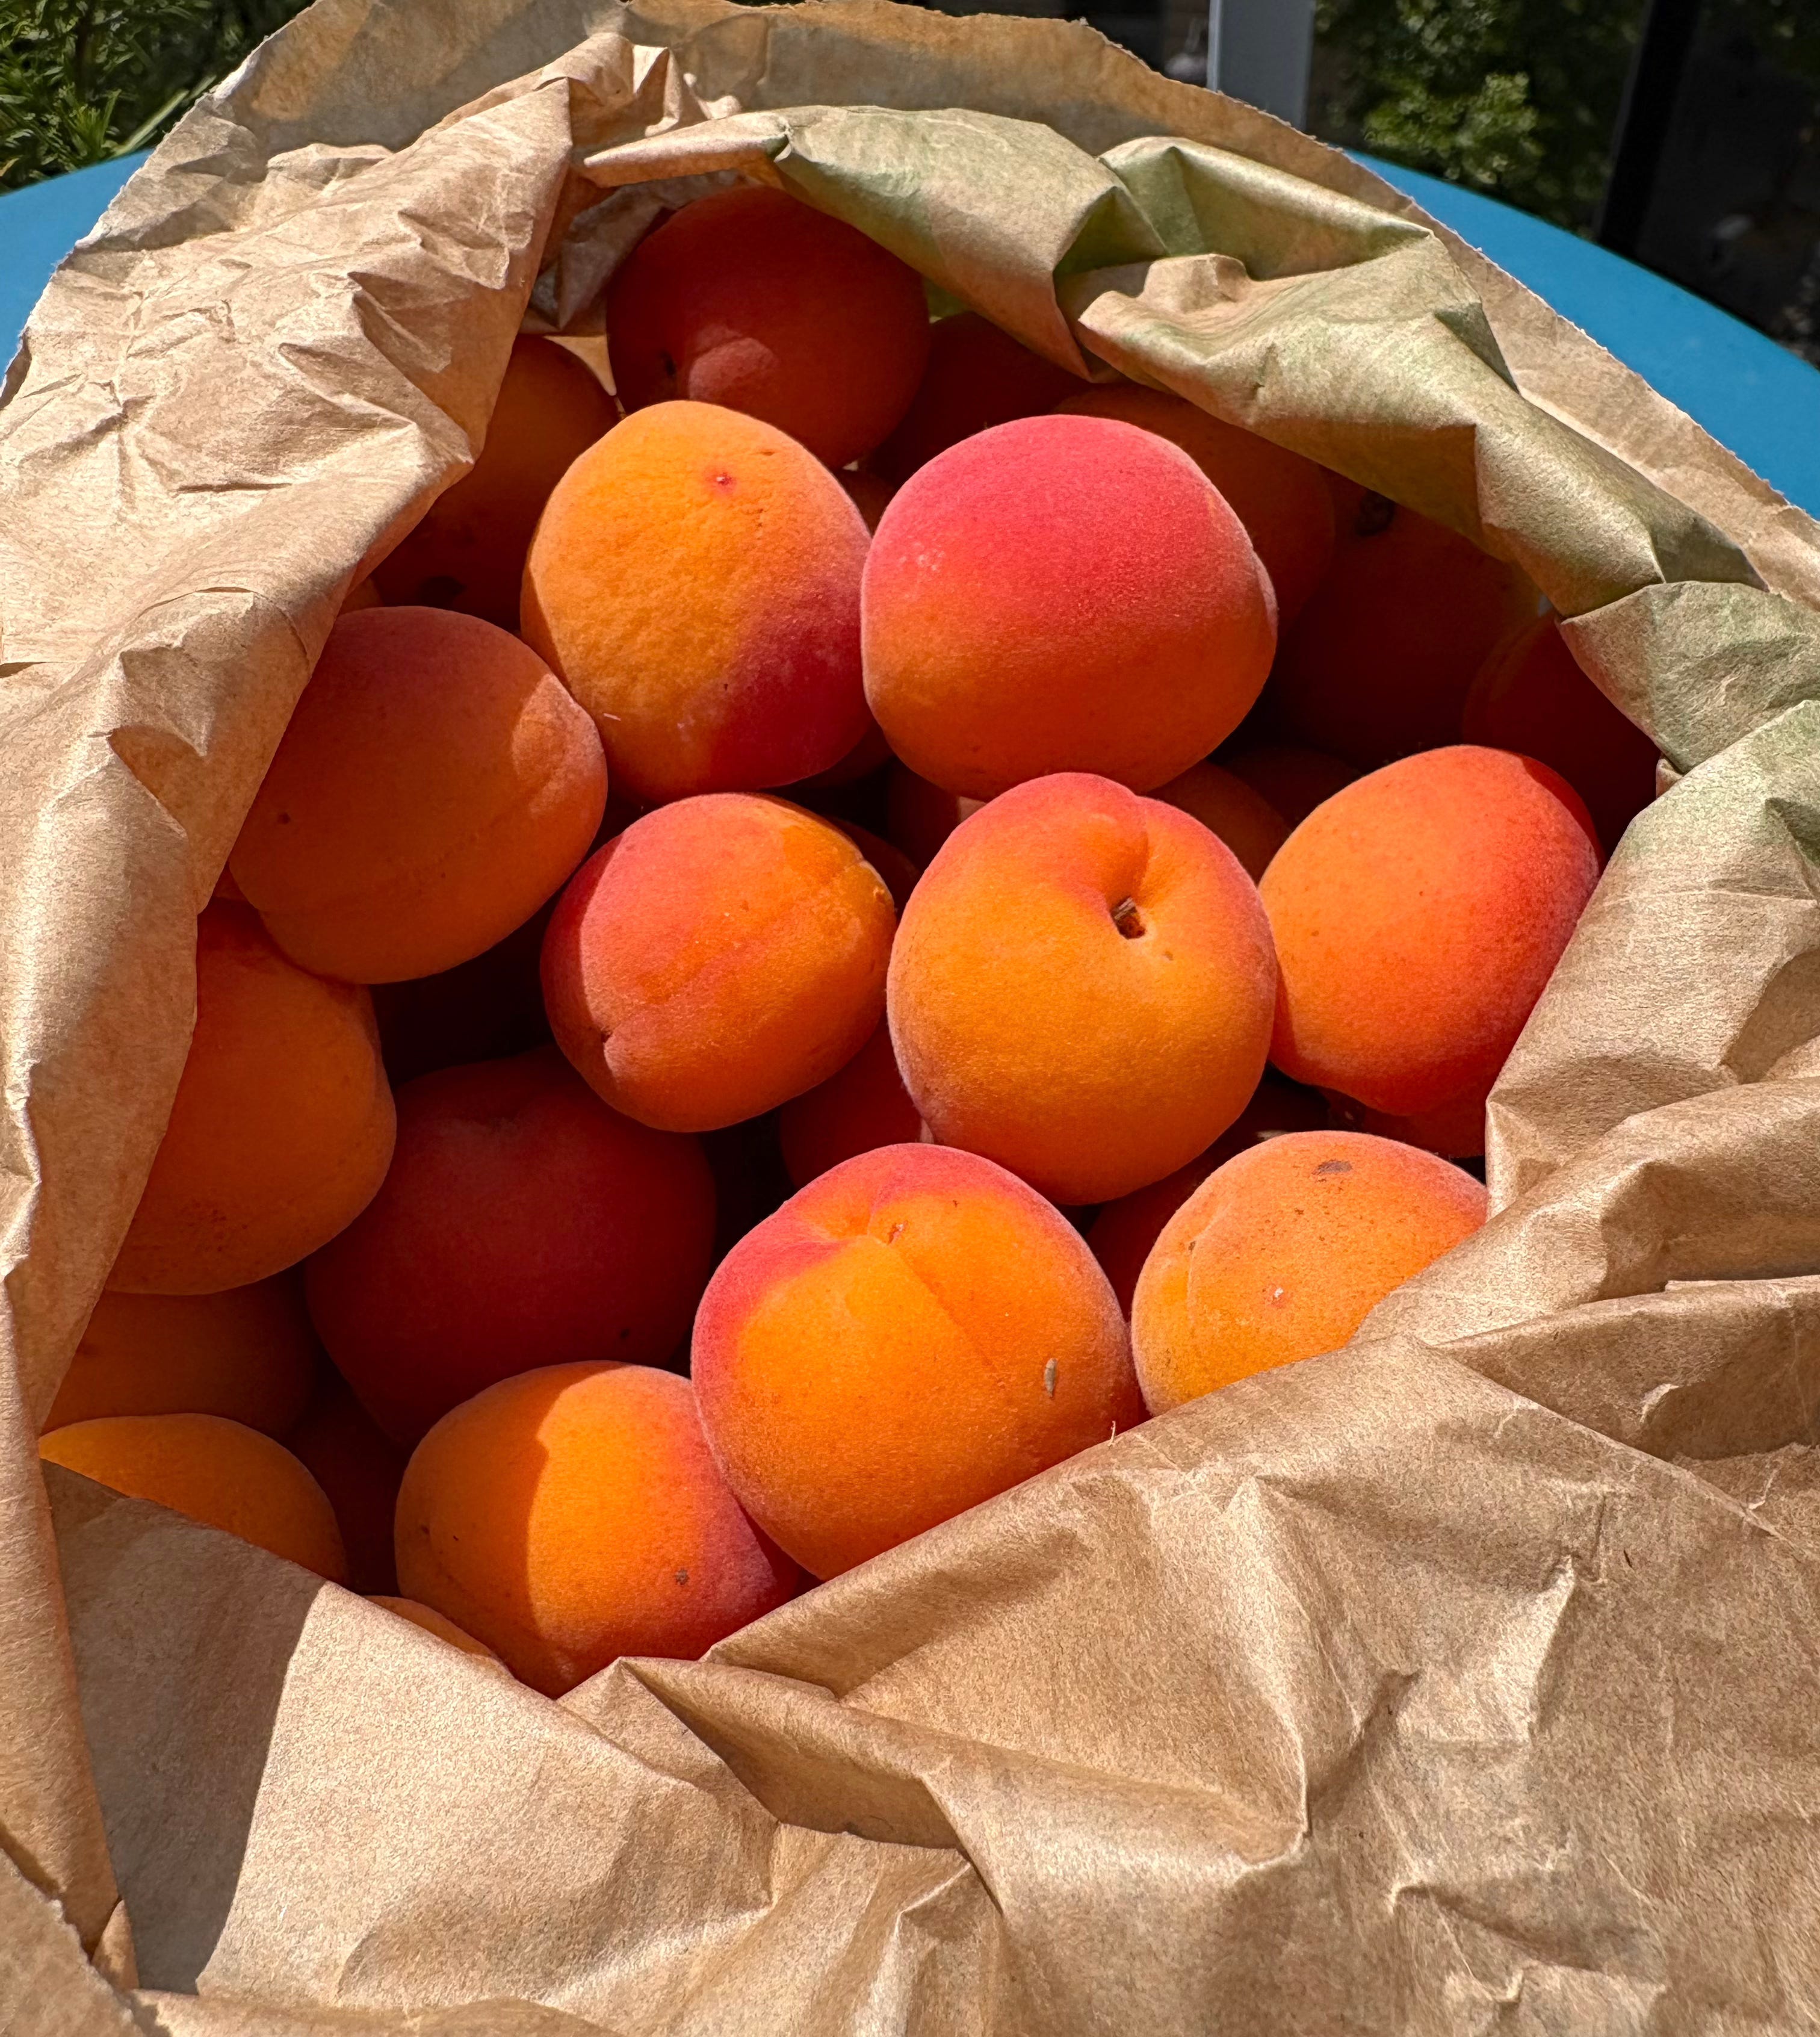
As soon as I saw Rebecca’s apricot galette on the book’s cover, I knew I’d be making it. Ever since I was a child, I’ve loved apricots. I loved them dried, I loved them canned, which was mostly the way we had them, and I especially loved them fresh. Even as a kid, I remember telling my mother that I thought that apricots were the fruit of the gods — and yes, she thought that was weird. Now, as a very grown-up, I’m more likely to snack on dried apricots or to snip them into things I’m baking than to reach for fresh ones, since a good apricot can be hard to find — unless you’re lucky enough to be in Paris when the markets have newly harvested apricots by the bushel, their skins blush-rose colored, their scent like perfume, their flavor ambrosial. Also, they’re juicy. Understanding that it’s not always easy to find lush apricots, Rebecca gives instructions for using canned ones, a good swap for this recipe.
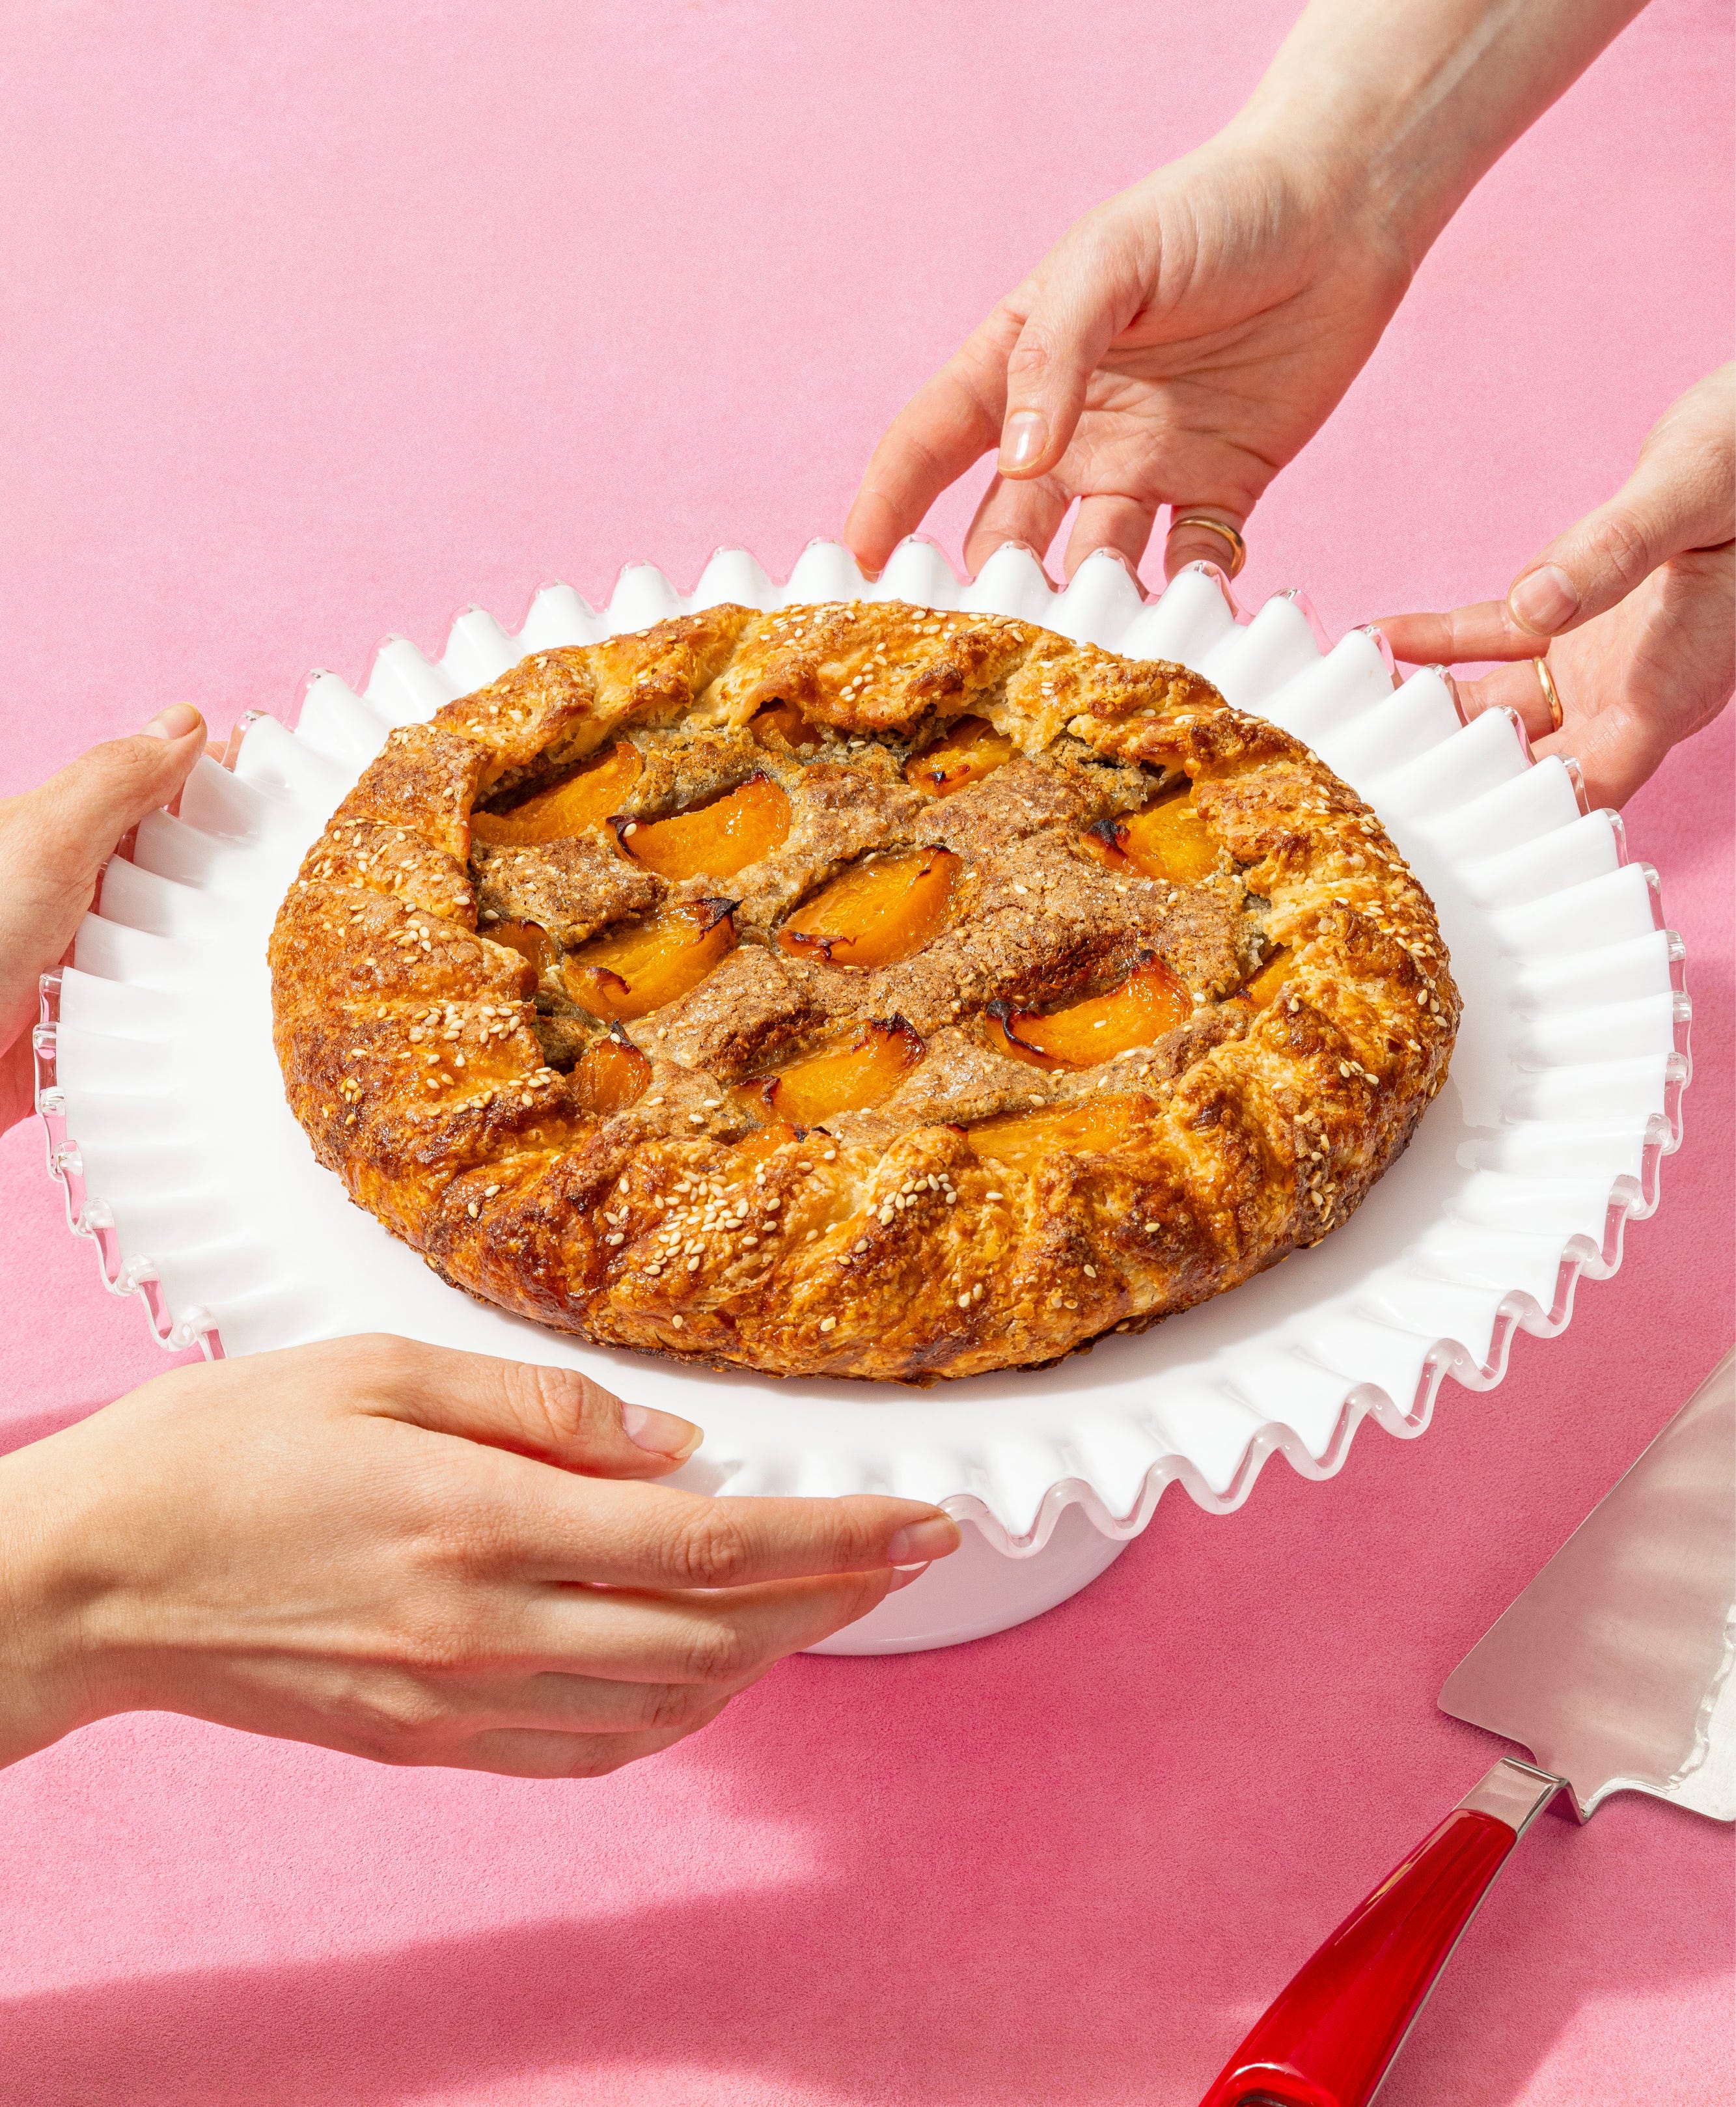
The super-interesting twist in Rebecca’s galette is the filling — if you’re like me, you’ll make it for the galette and then think about all the other ways you’ll want to have the filling. (I’ve got Bostock from
cued up for soon.) While the classic base for a fruit tart in France is crème d’amande, almond cream or frangipane, made with butter, eggs, sugar and almonds, Rebecca changes it up in every way. She uses pepitas instead of almonds and offers sunflower seeds as an alternative for the pumpkin seeds — they’re what I used because I had them. She adds sesame seeds and buckwheat flour — an out-of-left-field addition that gives the frangipane great color and a touch of earthiness. And then, along with the traditional butter and egg, she whirs tahini into the mix. The result? A filling that’s almost black sesame-ish — one of my favorite flavors — and perfect with apricots.Scroll down for the recipe.
Three cheers and thank you, Rebecca.
If you’re already a galette fan, I know you’ll be happy to tuck these recipes into your repertoire. And if you’re new to galettes — lucky you! You’re about to set out on a baking adventure with endless possibilities.


APRICOT AND PEPITA-SESAME FRANGIPANE
Adapted from GALETTE! by Rebecca Firkser (Artisan Books). Copyright © 2025. Photographs by Jessica Marx.
GOOD TO KNOW BEFORE YOU START
The crust (see below): You need to have the crust made and chilled before you use it for the galette. I found it most convenient to also have the dough rolled out before I started on the filling and fruit.
The seeds: Rebecca gives you a choice of pepita (pumpkin) or sunflower seeds — I had sunflower seeds in the freezer (it’s where I keep seeds and nuts to guard their freshness), so that’s what I used. They were delicious in the filling!
The color: My filling was darker than Rebecca’s — I think it was my buckwheat flour.
The apricots: You’ve got Rebecca’s permission to use canned fruit. She suggests apricot halves in juice or light syrup — drain them, dry them and cut them in half.
The oven temperature: You’ll bake the galette for 15 minutes or so and then you’ll need to lower the temperature — don’t forget!
Here’s what Rebecca has to say about her galette:
Bookmark this to make when you want to show off. The crust is filled with a thick layer of toasted seed frangipane with a touch of earthy buckwheat flour and rose water— sounds complicated, but it’s wildly simple. Petite apricot wedges stud the filling, making each bite floral and not too sweet. After tasting dozens of galettes, I never (ever) turn down a slice of this one.
Serves 6 to 8
INGREDIENTS
1/2 cup (100 grams) sugar, plus more for sprinkling
1/2 cup (60 grams) unsalted roasted pepitas or sunflower seeds (see above)
3 tablespoons (30 grams) buckwheat flour (see above)
1/2 teaspoon Diamond Crystal or 1/4 teaspoon Morton kosher salt
1/4 cup (65 grams) tahini
2 tablespoons unsalted butter, cut into small pieces, at room temperature
2 large eggs
1/4 teaspoon rose water or almond extract (optional)
3 tablespoons (25 grams) sesame seeds
1 standard disk A Good Crust (scroll down for recipe)
3 to 4 apricots (about 7 ounces/200 grams), pitted (no need to peel) and quartered (about 1 cup)
Flaky sea salt

DIRECTIONS
In a food processor, combine the sugar, pepitas (or sunflower seeds), buckwheat flour, and kosher salt and pulse until the mixture is finely ground, like almond flour. Pulse in the tahini, butter, 1 of the eggs, and the rose water or almond extract (if using) until mostly smooth. Pulse in 2 tablespoons of the sesame seeds until just combined but not blended. If not baking the galette immediately, refrigerate the frangipane in an airtight container for up to 1 week; bring to room temperature by letting it sit out until spreadable (for up to 2 hours) before using.


Preheat the oven to 425°F (220°C) with a rack positioned in the center. Line a sheet pan with parchment paper.
Roll the dough into a round and set it on the lined sheet pan using the Basic Method (see Crust recipe).
Spoon the frangipane into the crust, leaving a 2-inch (5 cm) border. Arrange the apricots cut-side up over the filling evenly in a single layer (there will be some open spaces where the filling is visible). Fold the edges of the crust over the filling toward the center, overlapping and pleating as desired. Freeze the galette on the sheet pan for 10 minutes.


In a small bowl, beat the remaining egg to make an egg wash. Remove the galette from the freezer and brush the egg wash over the exposed crust. Sprinkle the remaining 1 tablespoon sesame seeds over the crust, then more sugar over the entire galette.


Bake until the crust is starting to turn golden, 12 to 15 minutes. Reduce the oven temperature to 375°F (190°C) and continue to bake until the crust is deeply golden brown and the filling has puffed, another 25 to 35 minutes, rotating the pan front to back halfway through.
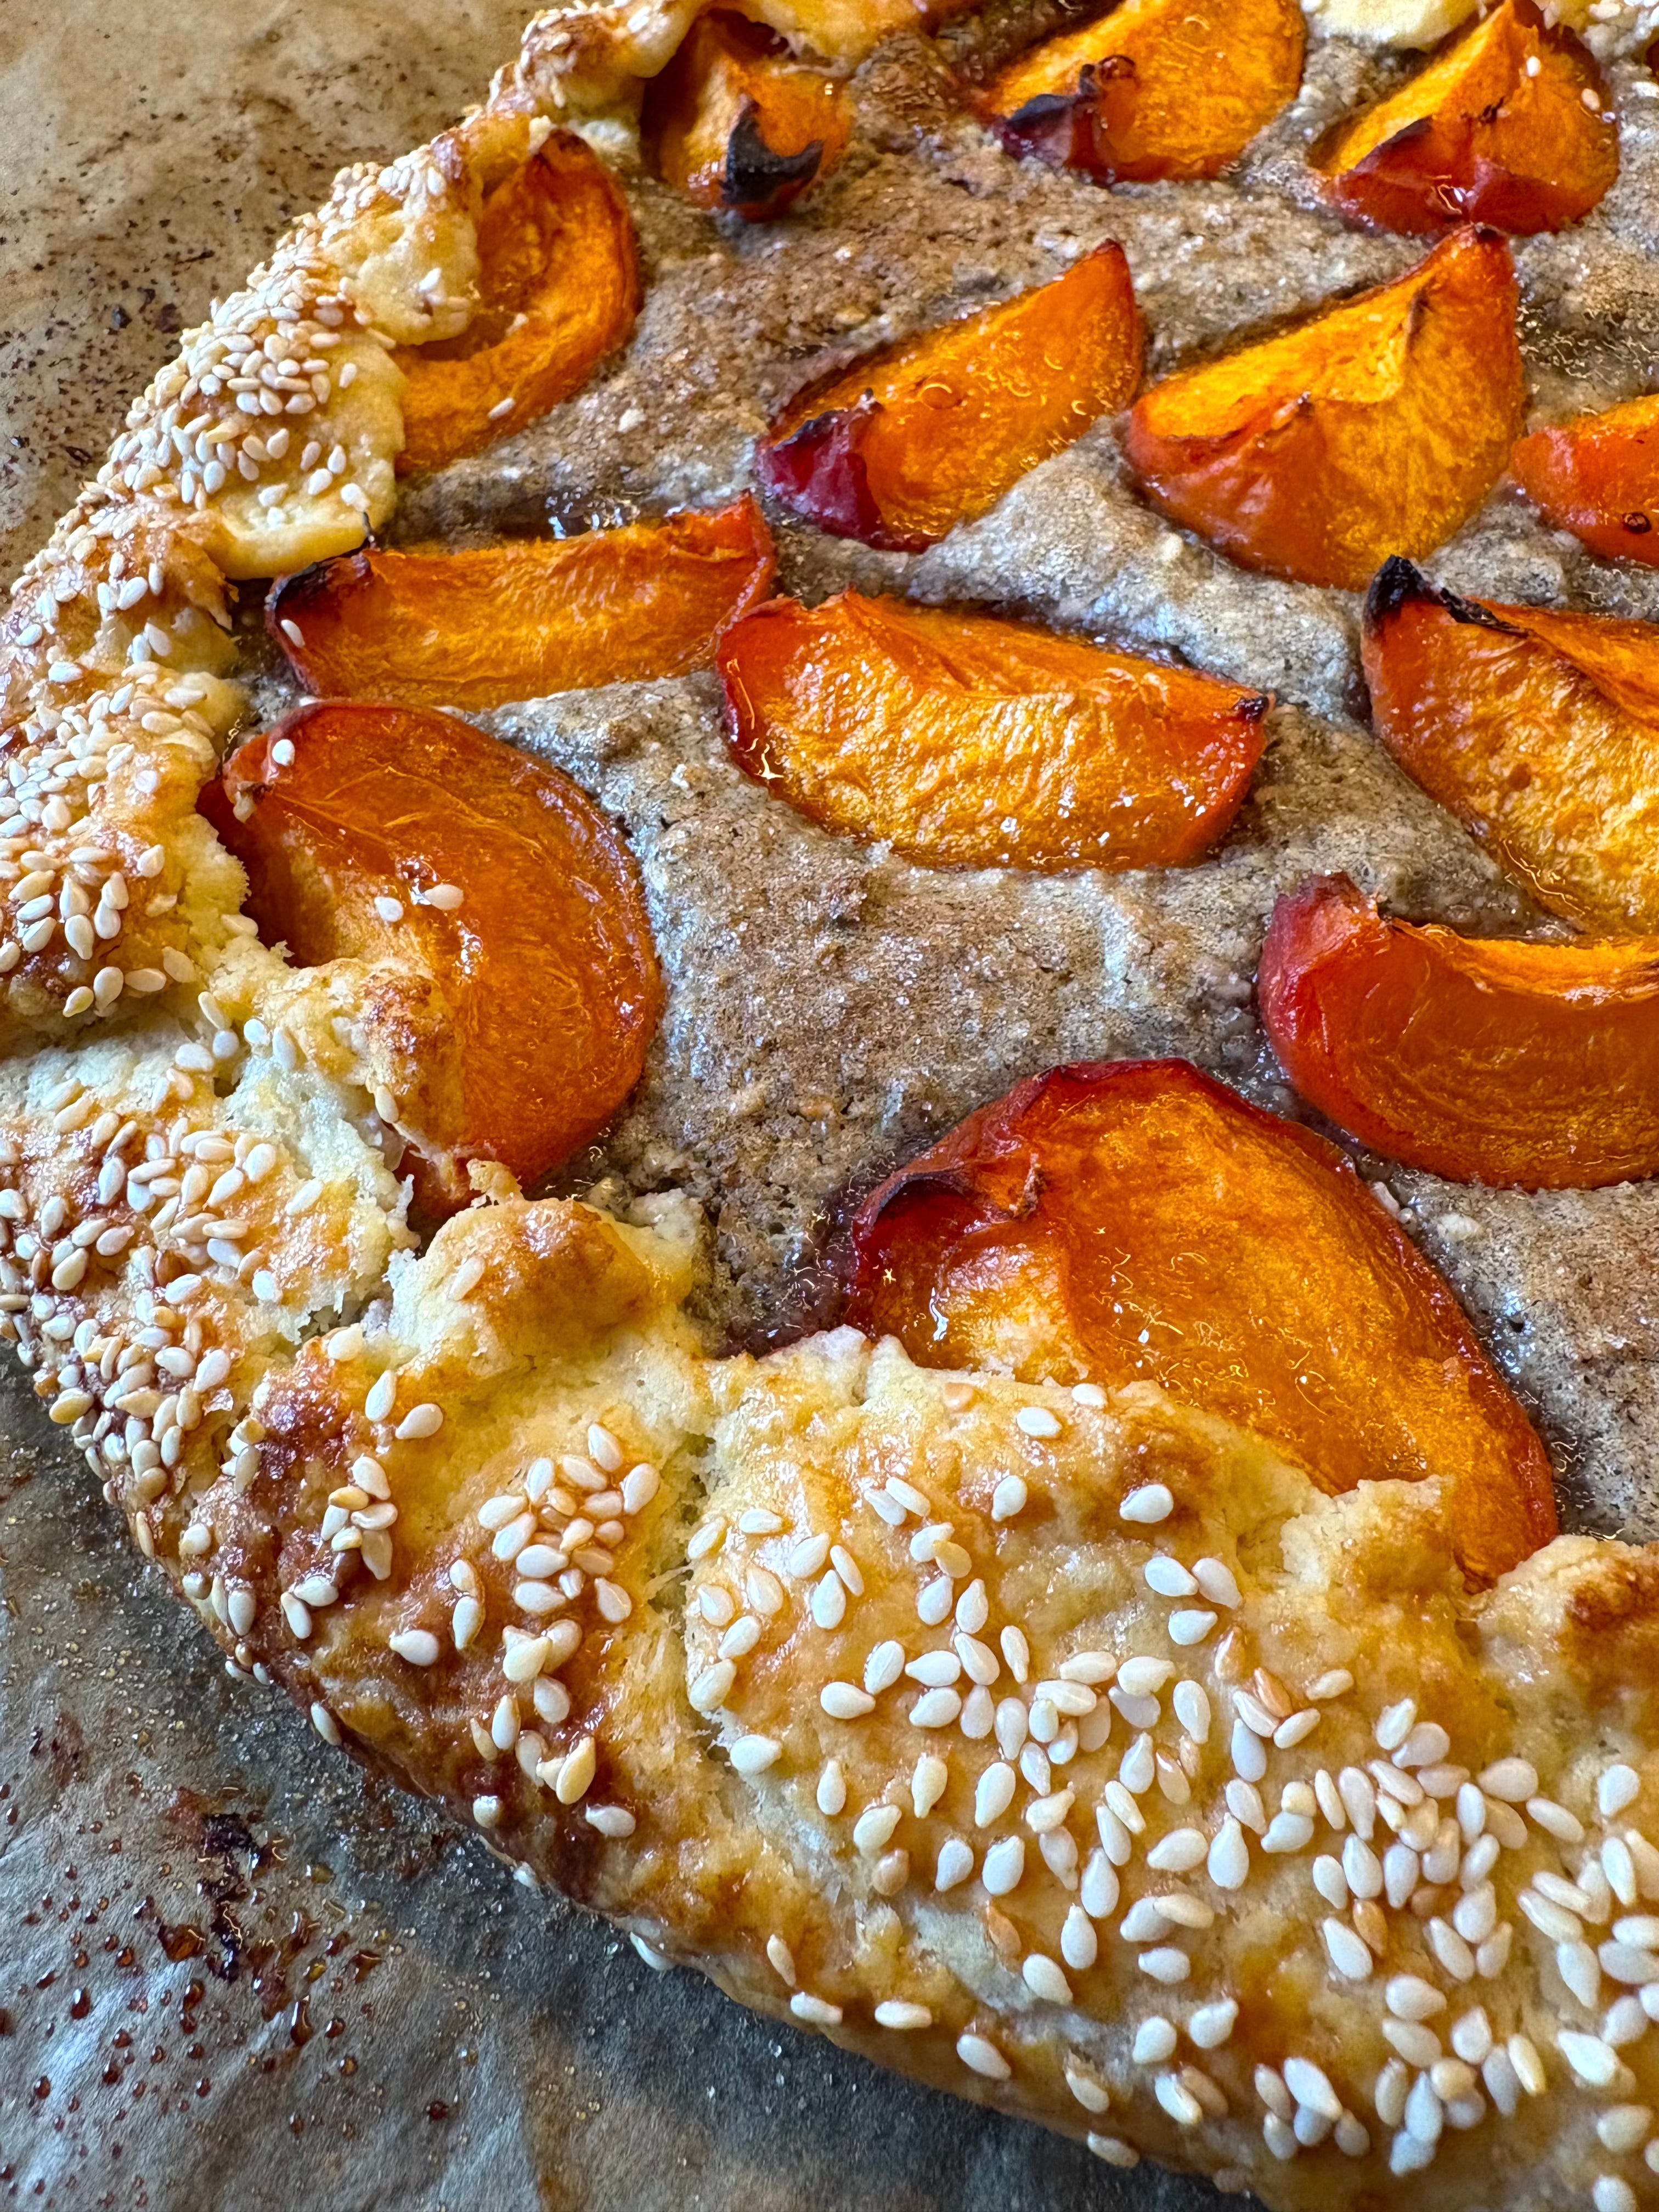
Remove the galette from the oven and sprinkle with some flaky sea salt. Cool, uncovered, for at least 15 minutes and up to 8 hours.
Slice and serve.
STORING / REHEATING: Leftovers can be stored in an airtight container in the refrigerator or at room temperature for up to 3 days. Reheat on a sheet pan in a 350°F (180°C) oven until warmed through, about 10 minutes.

A GOOD CRUST
Adapted from GALETTE! by Rebecca Firkser (Artisan Books). Copyright © 2025. Photographs by Jessica Marx.

GOOD TO KNOW BEFORE YOU START
The butter: As Rebecca mentions, if you use high-fat butter (as I did — French butter has a minimum of 82 % butterfat), your dough will be softer and you might need extra fridge time — I did. (Also, it was super-hot in my kitchen the day I made the crust.)
The vinegar: I didn’t have apple cider vinegar (even though I was sure I did), so I used the white wine vinegar I had. It was fine.
Makes 2 standard disks or 1 XL disk
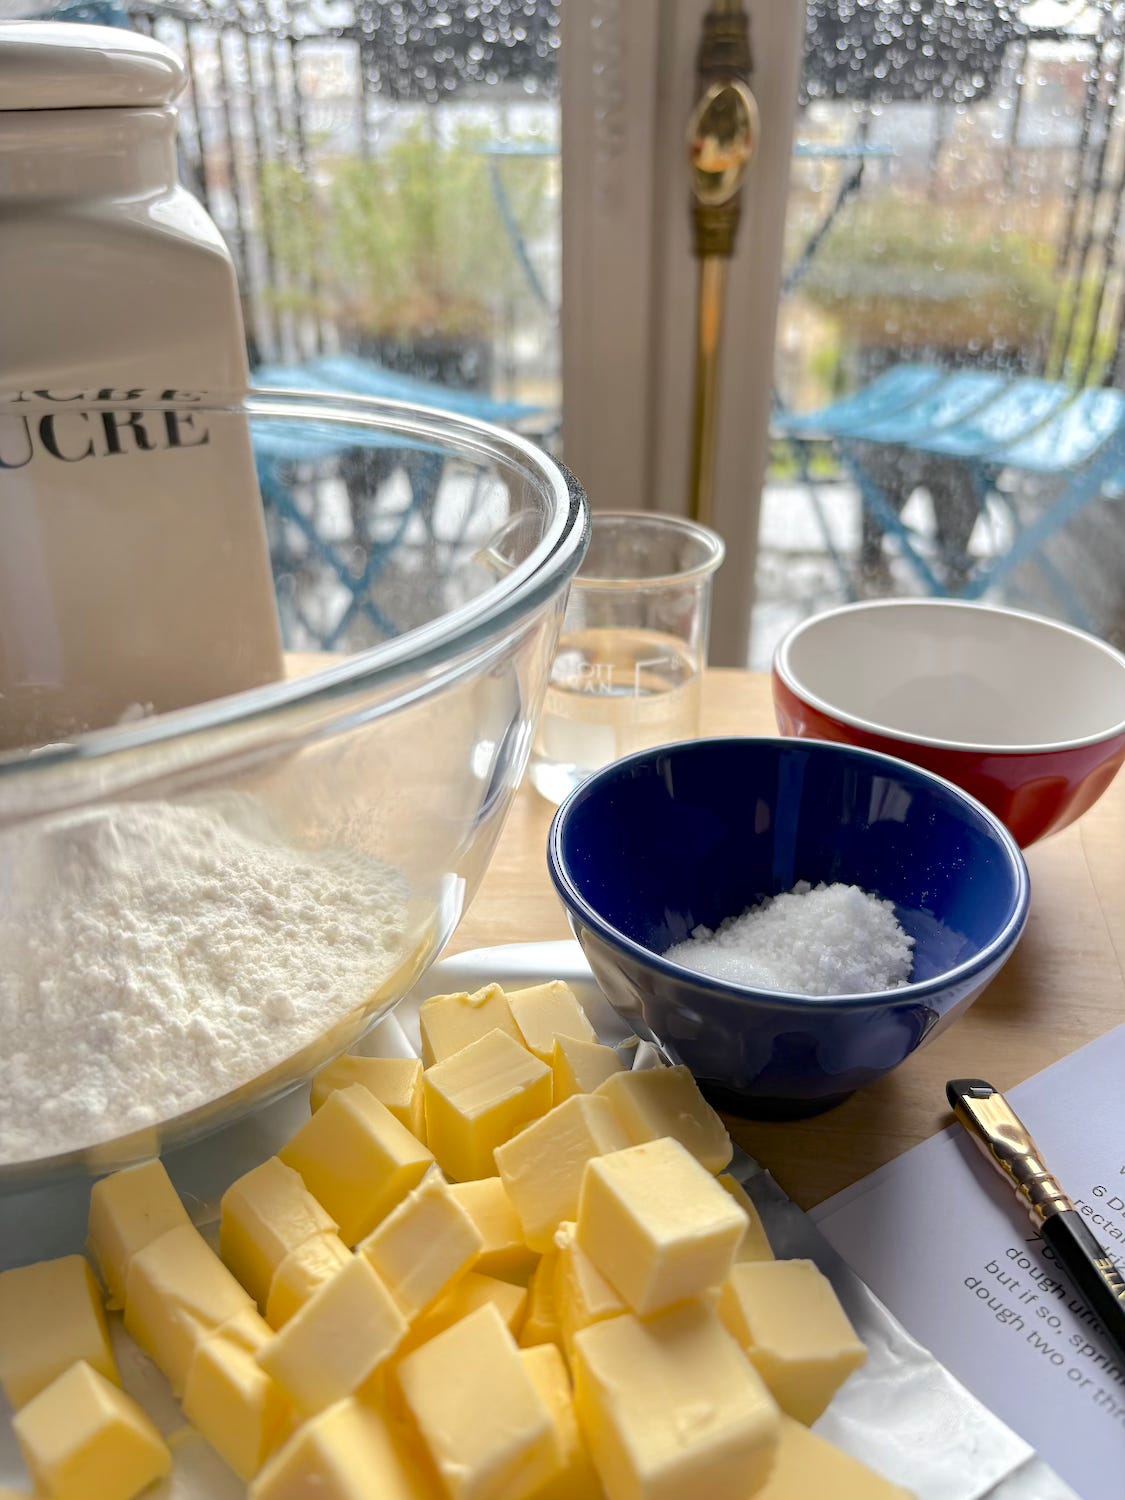
INGREDIENTS
1/2 cup (115 grams) water
1 tablespoon apple cider vinegar
2 3/4 cups (345 grams) spooned and leveled all-purpose flour, plus more as needed
1 tablespoon sugar
1 1/2 teaspoons Diamond Crystal or 3/4 teaspoon Morton kosher salt
2 1/2 sticks (10 ounces/285 grams) unsalted butter, cut into 1/2-inch (13 mm) cubes, chilled
DIRECTIONS
In a liquid measuring cup or a small bowl, combine the water and the vinegar. Place this in the freezer while you work on the next steps.
In a large bowl, use your fingers or a fork to combine the flour, sugar, and salt.
Add the butter to the large bowl and use your fingers or a fork to gently toss around the butter to coat it in the flour mixture. Use your fingers to smash and rub the butter into the flour mixture until it forms flat pieces mostly the size of cannellini beans (about 3/4 inch / 2 cm) with some smaller (think chickpeas and lentils; about 1/2 and 1/4 inch / 13 and 6 mm). The mixture should still look dry and crumbly.
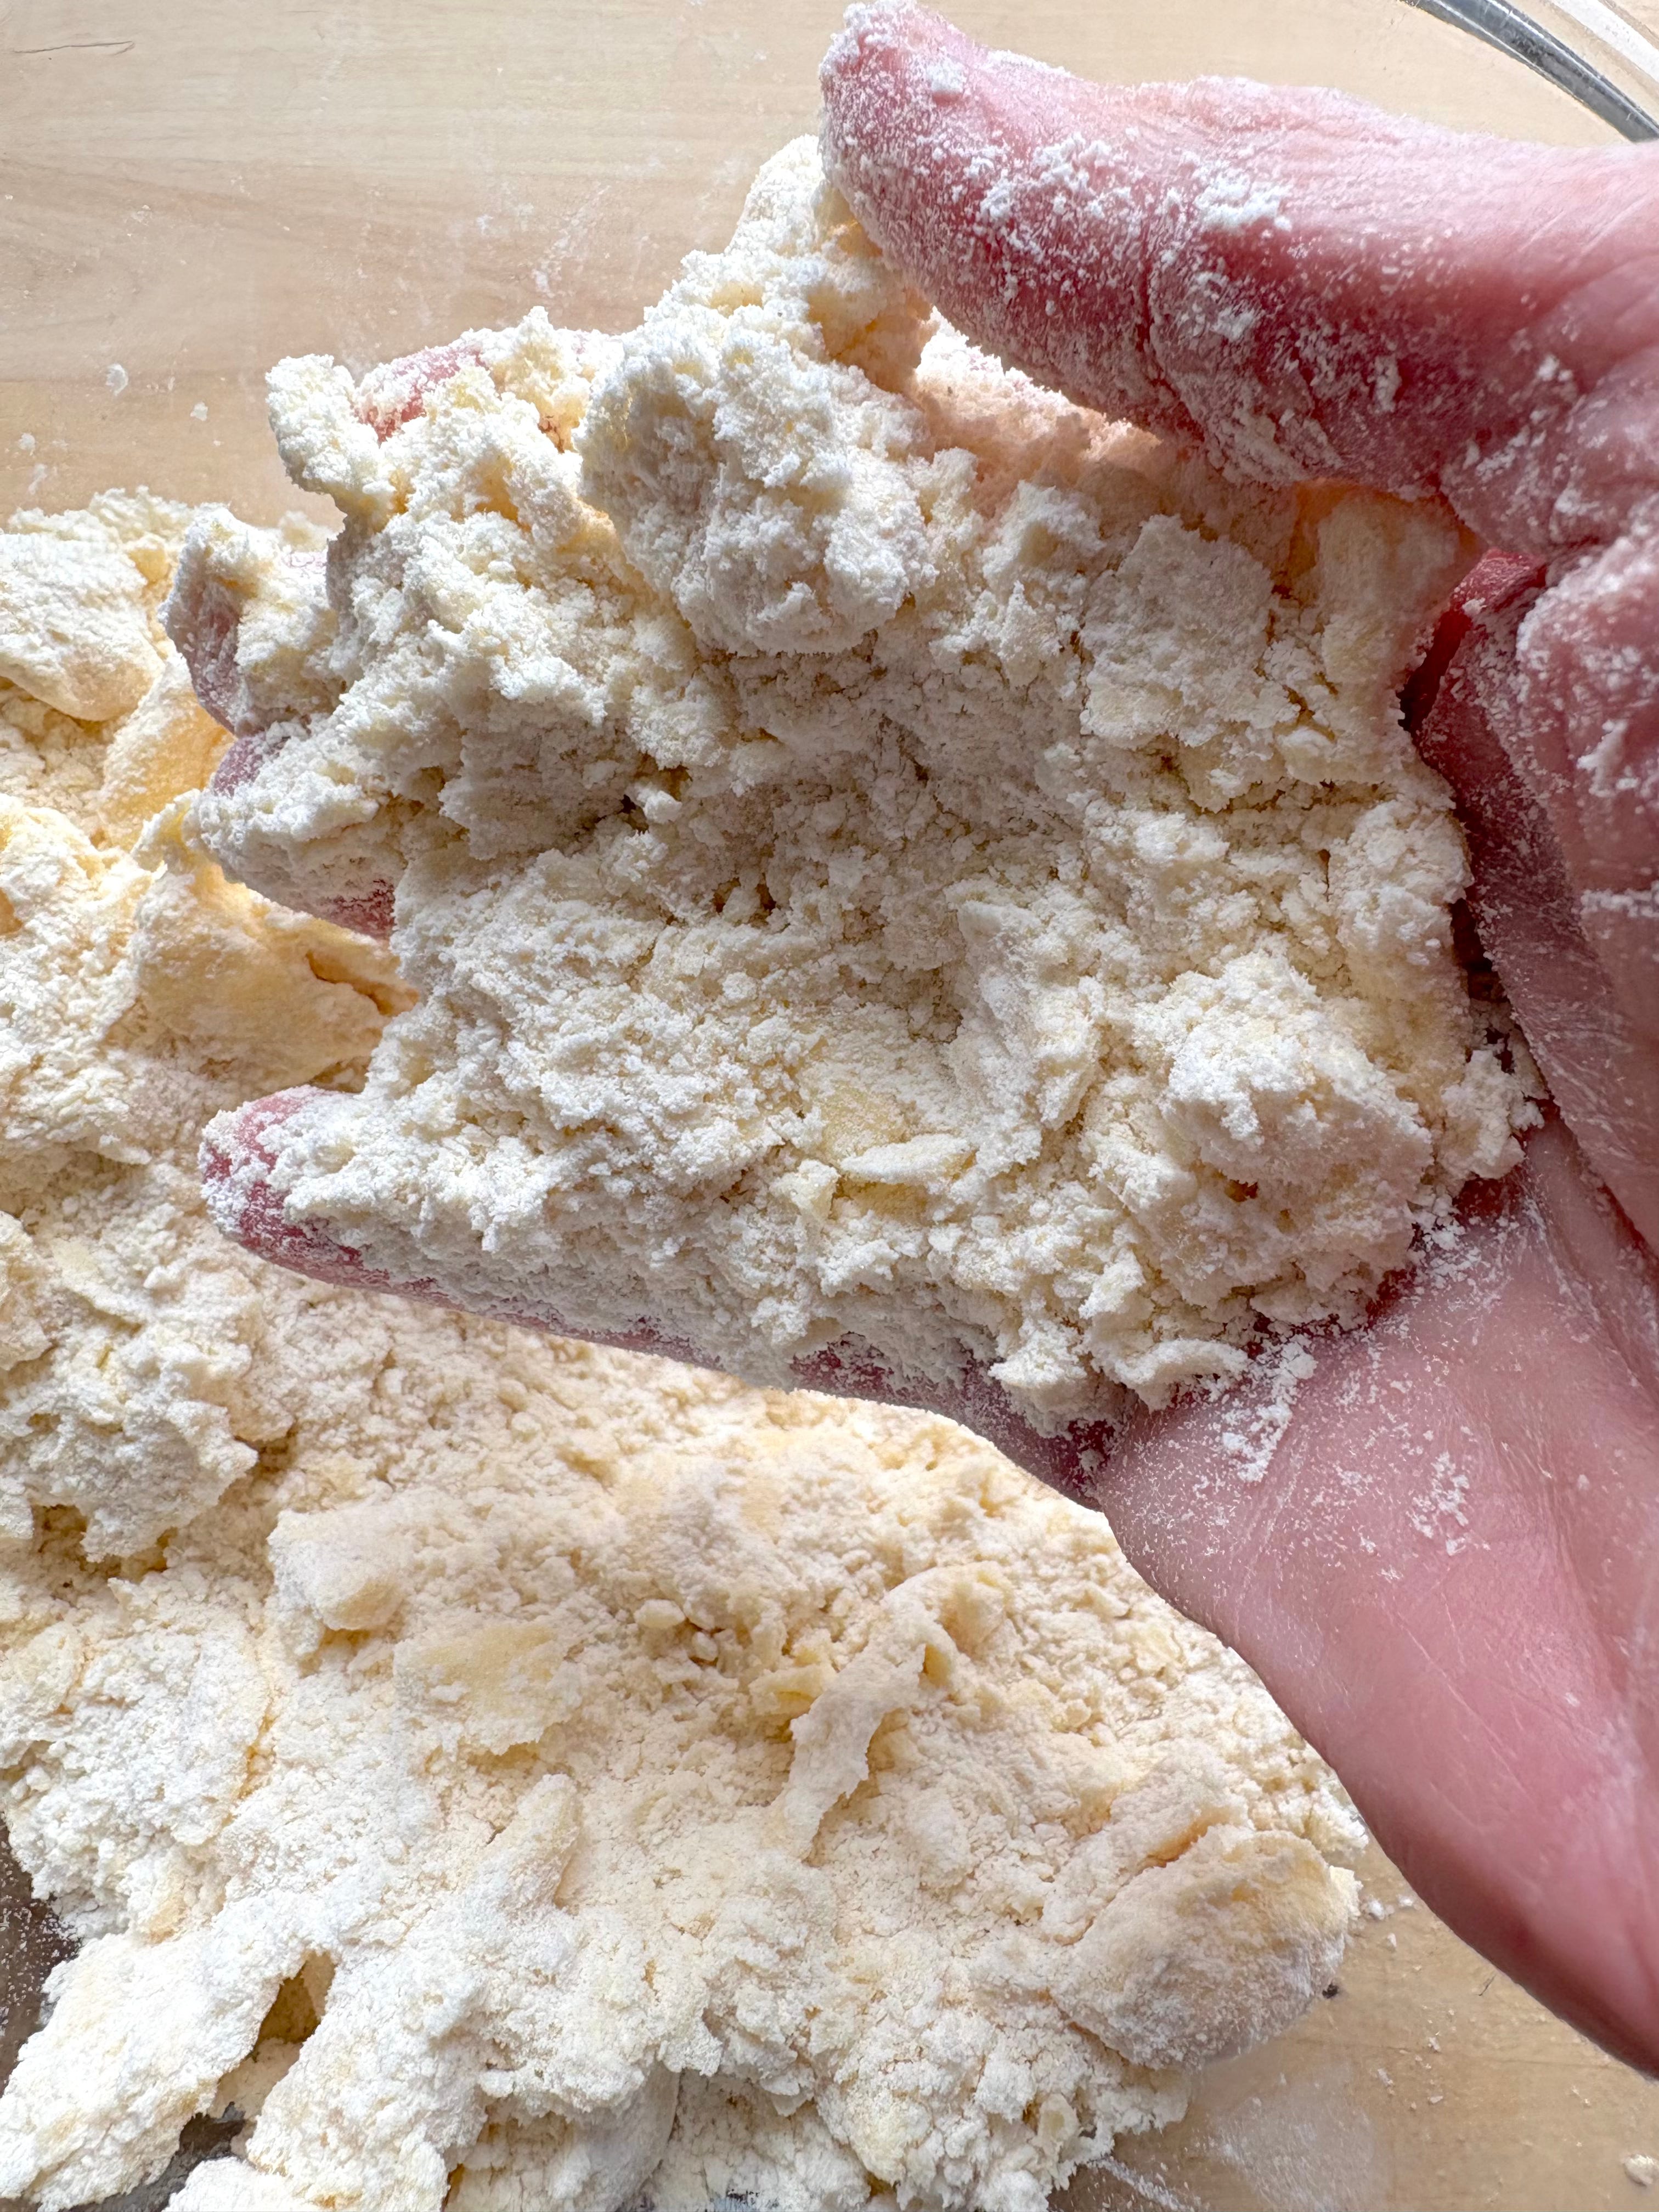
Remove the water-vinegar mixture from the freezer. Drizzle half of the water-vinegar mixture over the flour-butter mixture. Working from the bottom of the bowl up, use your fingers or a fork to gently toss the mixture together, as if you were tossing a salad. Drizzle over another splash of the water-vinegar mixture and toss. Continue to drizzle and toss until a shaggy, chunky mixture forms. It should not be completely combined yet, but there also should be no totally dry areas of flour (look for pebbles of moistened flour, not pure powder).
You may not need the full amount of water-vinegar mixture. When in doubt, err on the dry side: You can always add liquid, but you can’t take it away.
Here’s how to know if you’re in a good place: Pick up a handful of the mixture and squish it. It should mostly hold its stuck-together shape; if not, drizzle an additional 1 teaspoon water-vinegar mixture on the driest areas and toss again, repeating until it holds together.
Dump the mixture onto a clean work surface and use your hands to pat it together into a rectangular mass about 1 inch (2.5 cm) thick. If you find any more areas that look totally dry, drizzle them with another 1 teaspoon water-vinegar mixture.
Use your hands or a bench scraper to fold the mass of dough over itself. Press down the dough until it’s about 1 inch (2.5 cm) thick again. (The dough shouldn’t be moist or sticky, but if so, sprinkle it with a bit of flour as you fold.) Repeat folding and pressing down the dough two or three times. As you fold the dough over itself, the shaggy mass will form into a cohesive dough (this is also going to help the crust bake off extra-flaky). The butter should not blend all the way in, and the surface of the dough should look like marble or wood grain.
If making a standard disk (check your galette recipe): Divide the dough in half, placing each half on a piece of plastic wrap. If making an XL disk (check your galette recipe): Place the entire slab of dough on a piece of plastic wrap.
Wrap the dough in the plastic wrap, then press it into a round or rectangle (see Note) about 3/4 inch (2 cm) thick. Refrigerate for at least 2 hours and up to 5 days. (Alternatively, freeze for up to 3 months.)
Note: Shaping your dough into the approximate shape of your galette (round, rectangular, etc.) will be helpful when rolling it out, but it’s not imperative to achieve success. In fact, I typically shape my dough into squares for easy stacking in the freezer.
ROLLING OUT THE DOUGH
Depending on which galette you’re making, the dough will be rolled out a bit differently. Your galette recipe will note which of the following methods to use. If at any point your dough starts to get sticky during the rolling process (more likely to happen if your kitchen is warm or if you’ve used butter with a high fat content), return it to the plastic wrap or a sheet pan and refrigerate for at least 10 minutes to firm it back up, then pick up where you left off.
Note: Galette dough bakes most successfully when it isn’t overworked, and that applies to rolling as well. Apply firm, even pressure, and roll from the center of the dough out to the edges.
BASIC METHOD:
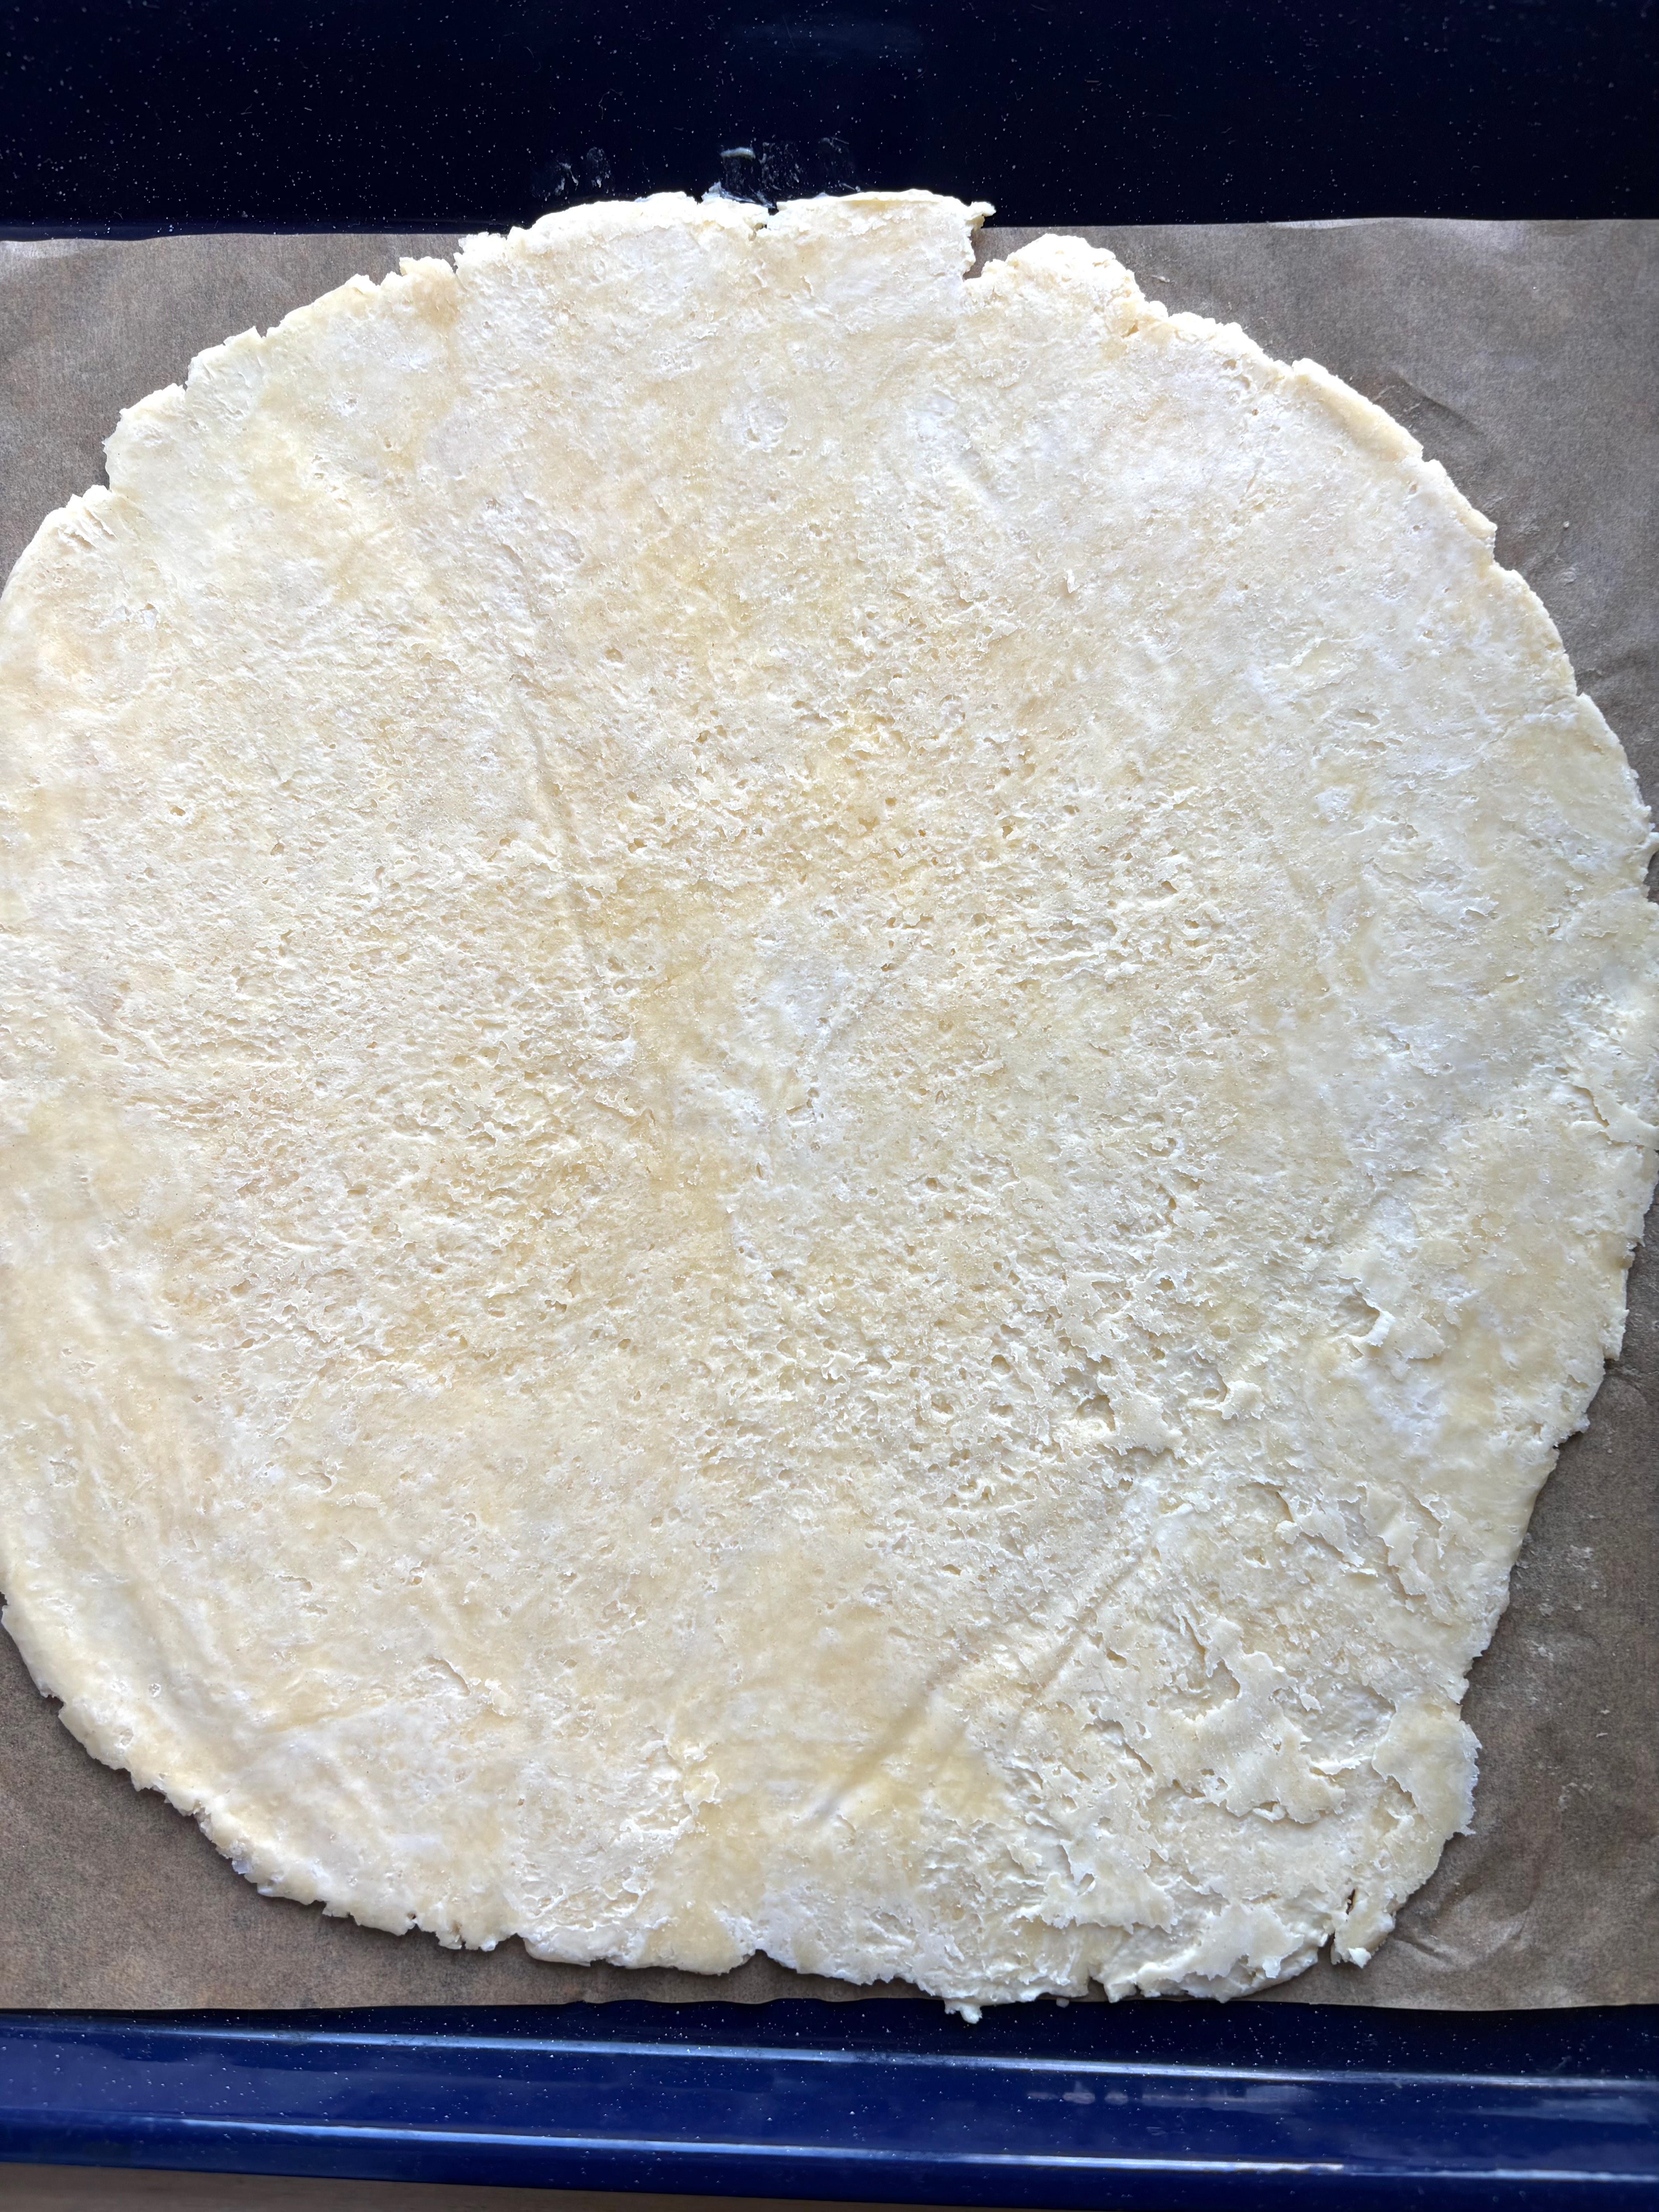
For a round or rectangular free-form galette baked on a parchment-lined sheet pan. Use 1 standard disk (see photos below).
Remove the rested dough from the refrigerator and let it sit out for 5 to 10 minutes (this allows the dough to soften slightly, making it easier to roll out, without getting too warm). Line a sheet pan with parchment paper. Dust a work surface lightly with flour.
Unwrap the dough, sprinkle it with flour, and use a rolling pin to roll it out, flipping and turning the dough and adding more flour as needed to avoid sticking, into a round about 13 1/2 inches (34 cm) in diameter and between 1/8 and 1/4 inch (3 and 6 mm) thick; or a rectangle about 14 by 11 inches (33 by 28 cm) and between 1/8 and 1/4 inch (3 and 6 mm) thick. If at any point the dough starts to crack, press it together with your fingers.
Gently fold the dough into quarters (this is just to help you move it; don’t press down), place on the parchment-lined sheet pan, and unfold. From here, return to the galette recipe.


📚 You can find more recipes in my latest book Baking with Dorie, and get ready for Dorie’s Anytime Cakes by pre-ordering at Bookshop.org, Barnes & Noble, Amazon, or RJ Julia (signed and personalized).
👋 Say hello and share what you're making on Facebook and Instagram.
ℹ️ Click here for helpful links while using Substack.
thank you so much for this, Dorie! 💕💕
Thank you for the shout out Dorie! xx I love this book; it's so summery and helps me deal with my pie anxieties.